

What Is IALA Buoyage System?
The International Association of Lighthouse Authorities (IALA) has divided its combined Cardinal and Lateral buoyage system into two region 'A' and 'B'.
Region A includes Europe, Australia, Newzealand, Africa, the Gulf and some Asian Countries.
Region B comprises North, South and Central America, Japan, Korea and Philippines.
In Region A, the colour red of the lateral buoyage is used to mark the port side of channels and the colour Green for the starboard side. In Region B, the colour are reversed.
IALA Buoyage System have a Five type of Marks:
LATERAL MARKS :
LATERAL MARKS : REGION A
|
|
Port Hand Marks |
Starboard
Hand Marks |
|
Colour |
Red
|
Green
|
|
Buoy Shape |
Cylindrical,
Pillar or Spar |
Conical,
Pillar or Spar |
|
Top mark |
Single
Red Cylinder |
Single
Green Cone, point Upwards |
|
Light Colour |
Red |
Green |
|
Light Rhythm |
Apart
from Composite Group Flashing (2+1) |
Apart
from Composite Group Flashing (2+1) |
|
|
Preferred Channel to SB |
Preferred Channel to Port |
|
Colour |
Red
with one broad Green horizontal band |
Green
with one Red horizontal band |
|
Buoy Shape |
Cylindrical,
Pillar or Spar |
Conical,
Pillar or Spar |
|
Top mark |
Single
Red Cylinder |
Single
Green Cone, point Upwards |
|
Light Colour |
Red |
Green |
|
Light Rhythm |
Composite
Group Flashing (2+1) |
Composite
Group Flashing (2+1) |
LATERAL MARKS : REGION B
|
|
Port Hand Marks |
Starboard
Hand Marks |
|
Colour |
Green |
Red |
|
Buoy Shape |
Cylindrical,
Pillar or Spar |
Conical,
Pillar or Spar |
|
Top mark |
Single
Green Cylinder |
Single
Red Cone, point Upwards |
|
Light Colour |
Green |
Red |
|
Light Rhythm |
Apart
from Composite Group Flashing (2+1) |
Apart
from Composite Group Flashing (2+1) |
|
|
Preferred Channel to SB |
Preferred Channel to Port |
|
Colour |
Green
with one broad red horizontal band |
Red
with one Green horizontal band |
|
Buoy Shape |
Cylindrical,
Pillar or Spar |
Conical,
Pillar or Spar |
|
Top mark |
Single
Green Cylinder |
Single
Red Cone, point Upwards |
|
Light Colour |
Green |
Red |
|
Light Rhythm |
Composite
Group Flashing (2+1) |
Composite
Group Flashing (2+1) |
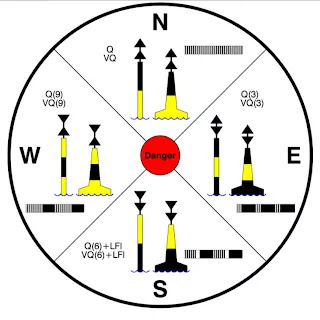
CARDINAL MARKS :
|
|
North
Cardinal Marks |
East
Cardinal marks |
|
Colour |
Black
above Yellow |
Black
with a single broad horizontal yellow band |
|
Buoy Shape |
Pillar
or Spar |
Pillar
or Spar |
|
Top mark |
2
Black cones, One above the other, pointing
upward |
2
Black cones, One above the other, base to base |
|
Light Colour |
White |
White |
|
Light Rhythm |
VQ = 120 flashes/min Or Q = 60 flashes/min |
VQ (3 flashes) every 5 Sec. OrQ (3 flashes) every 10 Sec. |
|
|
South
Cardinal Marks |
West
Cardinal marks |
|
Colour |
Yellow
above Black |
Yellow
with a single broad horizontal black band |
|
Buoy Shape |
Pillar
or Spar |
Pillar
or Spar |
|
Top mark |
2
Black cones, One above the other, pointing downward |
2
Black cones, one above the other , point to point |
|
Light Colour |
White |
White |
|
Light Rhythm |
VQ (6 flashes) + long flash every 10 sec. Or Q (6 flashes) + long flash every 15 sec. |
VQ (9 flashes) every 15 Sec. Or Q (9 flashes) every 10 Sec. |
ISOLATED DANGER MARKS :
|
|
Isolated
Danger Mark |
|
Colour |
Black
with one or more broad horizontal red band |
|
Buoy Shape |
Optional,
but not conflicting with lateral marks; Pillar or Spar preferred |
|
Top mark |
2
Black spheres, One above the other |
|
Light Colour |
White |
|
Light Rhythm |
Group
flashing (2) |
SAFE WATER MARKS :
|
|
Safe
Water Mark |
|
Colour |
Red
and White vertical stripes |
|
Buoy Shape |
Spherical;
pillar or spar with spherical topmark |
|
Top mark |
Single
red sphere |
|
Light Colour |
White |
|
Light Rhythm |
Isophase, occulting, one long flash every 10 sec or Morse ‘A’ |
SPECIAL MARKS :
|
|
Special
Mark |
|
Colour |
Yellow
|
|
Buoy Shape |
Optional
but not conflicting with navigational marks |
|
Top mark |
Single
yellow ‘X’ shape |
|
Light Colour |
Yellow |
|
Light Rhythm |
Any
other than those described in cardinal, isolated danger and safe water marks |


.webp)

0 Comments